How to publish data with the Data Aggregator DAGI
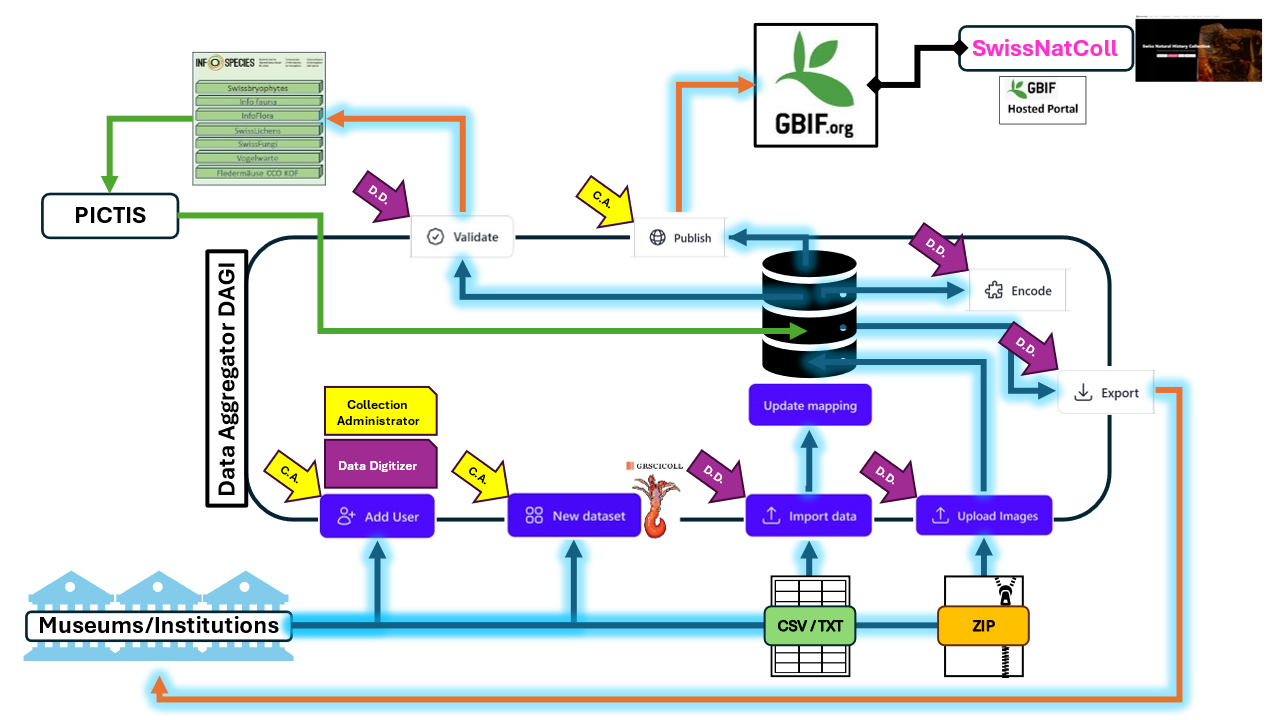
In order to publish your data on GBIF.org and have it displayed on the SwissNatColl portal, you need to first prepare an import file with all the data you want to publish (see Prepare my data here below).
After preparing it, you are ready to log in and import your data in the Data Aggregator (DAGI) app. Then, when done with the mapping and encoding of your data, the dataset is ready to be published on GBIF.org. From there, it will be displayed on the SwissNatColl portal, in the Occurrence data section.
A feature currently in development will also allow you to send your swiss data for validation to the Infospecies data centers experts.
Checklist -to do before logging in the Data Aggregator DAGI
✅ My institution is registered on GRSciColl.
⚠️ If your institution is not registered on GRSciColl, please contact GBIF Swiss Node.
✅ My collection is registered in my institution on GRSciColl.
Example: Herbarium – De Candolle’s Prodromus
⚠️ If your collection is not registered on GRSciColl or it needs adjustments, please do the appropriate changes and suggestions of change on your GRSciColl collection page.
✅ My institution has at least one user, with the Collection Administrator role, registered in DAGI.
- Collection Administrator ⚠️mandatory
- Data Digitizer 💡optional
⚠️ If your institution does not yet have a Collection Administrator, please send a request by email to contact-swissnatcoll@infofauna.ch with your full name, institution email and institution name.
✅ My dataset has all mandatory fields (attributes) correctly informed to ensure successfull import in DAGI.
- scientificName (definition)
- catalogNumber (definition)
✅ My ready-for-import dataset file is an UTF-8 encoded csv or text file with tab separation and Darwin Core standardised columns and cell content.
catalogNumber scientificName eventDate recordedBy …
XXX-123456789 Poa annua L. 2024-10-09 Weber Morgan …
… … … … …
XXX-234567890 Poa annua L. 2024-10-08 Weber Morgan …
✅ My ready-for-import dataset file has a maximum size of 800 Mbyte (= 800 Mo).
The Data Aggregator tracks all imported files, even if they contain the same data. If your catalogNumber remains unchanged, each new import will update the corresponding existing data.
Prepare my data
- Focus on the most important fields first (Mandatory fields, MIDS fields) and then proceed with the ones you think are important/interesting to be made publicly available.
- You don’t need to import your entire database into the Aggregator. Some of your fields are purely internal management.
- You don’t need to import your entire database into the Aggregator. Some of your fields are purely internal management.
- Make sure the fields which require special values in DAGI are filled in correctly.
- Check that your file does not have
- catalogNumber duplicates
- empty scientificName or catalogNumber cells
- duplicated headers (field names) or un-titled columns
- an unwanted space after a header
⚠️ There are fields that you don’t need to have in your import file because they are added by DAGI automatically : institutionCode, institutionID, collectionCode, collectionID and datasetID. These attributes are fixed by GRSciColl and GBIF.
Please refer to our FAQs for more details on preparing your data for import into DAGI.
What you are expected to have at the end of this step:
✅ 1 .csv or tab-separated .txt file of a maximum size of 800 Mbyte (= 800 Mo), containing your data arranged as each line represents one occurrence/specimen, each column represents one attribute, and there are no empty lines.
.| catalogNumber | scientificName | ... | country | stateProvince | ... |
|---|---|---|---|---|---|
| XXX-0123456 | Cyclamen hederifolium Aiton | ... | Switzerland | Geneve | ... |
| XXX-7891011 | Cyclamen hederifolium Aiton | ... | Switzerland | Vaud | ... |
| ... | ... | ... | ... | ... | ... |
| XXX-9999998 | Serratula tinctoria L. subsp. tinctoria | ... | Switzerland | ... | |
| XXX-9999999 | Serratula tinctoria L. subsp. tinctoria | ... | Switzerland | Ticino | ... |
⚠️ Leave uninformed cells EMPTY. Remove all "n.a.", "NA", "N/A", "unknown", "indet.", etc. values from your file or you may receive an error message during import. ⚠️
Log in
- Go to the Data Aggregator DAGI website.
- Insert your login details in the corresponding fields.
- After signing in, you have access to your institution page of DAGI, which can be seen only by the users registered in your institution.
There are two different views on your institution page:
- Datasets: displays all the datasets of your institution already added in DAGI.
- Administration: ⚠️visible only to Collection Administrators ⚠️, displays all users already added to your institution.
Additionnally, there are two icons opening the pages on the SwissNatColl portal with support material to help you using DAGI.
- Guide: opens the How to publish data with the Data Aggregator page on the SwissNatColl hosted portal (this page)
- Tutorials: opens the Tutorial sessions for the Data Aggregator users page on the SwissNatColl hosted portal
Add a new dataset
- Go to the Datasets view of your institution page by clicking on Datasets on the left side of the window.
- On this page, you can see all the datasets of your institution that have already been added in DAGI. The names of the datasets are based on the GRSciColl collection names.
- You can order the dataset list by clicking on the columns titles (Name, Code, State, Institution Code, Institution, Progress, Records count / est. and Updated At, see the Datasets view hparagraph for a precise description). By clicking twice or more, you can order them in an ascending or descending order.
- The State column informs you of the process step currently running (Importing, Encoding, Publishing, Deleting). Unless the State of a dataset is on “🕒Ready”, no other action can be started until the current one is executed. Depending on the number of records, it can take up to a few hours.
- If your Datasets view is empty, click either on the + New dataset button in the center of the page or on 🪟New dataset on the top-right corner of the window (it does the same thing at this point).
- If your Datasets page already has datasets, click on the 🪟New dataset button in the top right corner of the page.
— A pop-up window New Dataset has opened. —
- Select the type of your data. ⚠️Mandatory⚠️
- Available types: Zoology, Botany, Geology, Paleontology
- Select the corresponding GRSciColl Collection of your institution. ⚠️Mandatory⚠️
- If the GRSciColl collection has already been added on DAGI, it is not present anymore in the drop-down list of this pop-up window. You can find it on the Datasets view.
- Add a description of the dataset. 💡optional💡
- Click on Create dataset
- If you change your mind, you can cancel and close the window at any time by clicking on Cancel, or edit the dataset afterwards.
- ⚠️Avoid deleting a dataset after creating it, especially after publishing on GBIF or it might create unwanted duplicates⚠️. Please take contact with contact-swissnatcoll@infofauna.ch, so we can advise you correctly.
- The pop-up window closes itself and you are now on the page of the dataset you just added.
What you expect to have at the end of this step:
✅ A new dataset in the Datasets view of your institution
Import my data
- Go to the Datasets view of your institution page by clicking on Datasets on the left side of the window.
- Click on the dataset name in which you want to import your data.
- For each dataset in DAGI, you have 6 tabs, in a grey bar on top of the dataset page (Records, Imports, Exports, Publications and Validations, Image Upload, Published Records) (see the Dataset page paragraph for a precise description).
- The tab Records displays the imported records available in your dataset.
- The tab Imports displays all the files you have imported.
- The tab Exports displays all the files you have exported.
- The tab Publications and Validations displays all the files you have published on GBIF.org or sent for validation to the InfoSpecies data centers.
- The tab Image Upload displays all the files with images you have imported.
- The tab Published Records displays all the records that have been already published.
- If your dataset is empty, click either on the + Import button in the center of the page, or the 📤Import data button in the top-right corner of the window (it does the same thing at this point).
- If your dataset already has records and you want to add new records or update the existing ones, click on the 📤Import data button in the top-right corner of the window.
— A three-steps pop-up window Import records has opened. —
- (Step 1️⃣ of 3️⃣) Click on Choose a file to select your prepared .csv/.txt file or drag and drop it if you have a folder window opened on your screen.
- Wait until the purple bar is full.
- Click on Next
Map my data
The mappings window (Step 2️⃣ of 3️⃣) has three parts:
| Quick Start | if your field names are exactly the same as the DAGI attributes, the mapping can be automatically performed by ✨Try auto-mapping. The second button 🔄️Load existing mapping can be used after the first mapping. It mapps your fields the same way you mapped them previously (as long as your field names do not change). |
| Required attributes | mandatory attributes that have to be mapped in order to go to the next step. Two attributes are mandatory in DAGI scientificName and catalogNumber. |
| Additional columns | the other columns present in your import file. The button ➕Add all is available for clicking. It adds all of your columns at once. Then you can select the corresponding DAGI attribute for each of them. You can also click directly on the grey area with the column name to add them one by one on top of the list of already mapped columns. |
- If your field names are 100% the same as the DAGI’s attribute, click on ✨Try auto-mapping.
- If you already did a mapping, click on 🔄️Load existing mapping and simply check the mapping before clicking on Update mapping.
- If it is your first mapping and your field names are different than the DAGI attributes, select first the Required attributes by clicking on the drop-down menu Select a column of both attributes. You can then select the corresponding field in your imported file.
- By typing the beginning of your field names in the search bar, you can find them more easily.
- If unsure of the correspondence between the attributes and your field names, consult the Darwin Core FAQs section Where can I find the Darwin Core terms description?.
- For the Additional columns, either click on ➕ Add all or add them one by one by clicking on the attribute names (with grey background) to map your fields with the DAGI attributes.
- The added attributes appear at the top of the Additional columns list when added one by one, and at the bottom of the list when added with ➕ Add all.
- The unmapped fields of your file are listed on top of the Additional columns list with a grey background. It is not mandatory to map all of your file fields.
- Repeat these steps until all of the fields you want to import are mapped.
- If you can’t find a DAGI attribute corresponding to one or more of your fields, you have the possibility to map it as a “Custom Attribute”. ⚠️ Custom Attributes can’t be encoded nor published on GBIF but may be available for other features in DAGI (e.g. Validation process)
- If you can’t find a DAGI attribute corresponding to one or more of your fields, you have the possibility to map it as a “Custom Attribute”. ⚠️ Custom Attributes can’t be encoded nor published on GBIF but may be available for other features in DAGI (e.g. Validation process)
- When satisfied with your mapping, click on Update mapping.
- (Step 3️⃣ of 3️⃣) The last step is a summary window on which you can check your file name and size, creation date, the number of rows, and the mapped and unmapped fields.
- If you want to keep a trace of your mapping, you can select the whole summary window and copy-paste it on your computer. This might also help you keept track of the correspondance between your database field names and the Darwin Core attributes of DAGI.
- When satisfied, click on Run import.
- The page displayed is now the Imports tab, where you can see all your imported files for a given dataset at all times. By clicking on the blue icon of the size (📥xyz.x Mbyte), you can download your imported file.
- A progression bar appears during the import process and disappears when finished. ⚠️ Depending on the size of your imported dataset, this step can take up to a day to be completed ⚠️ Closing your navigator has not impact on the process, you can come back later to check the import state.
- If the import worked, the State is ✅ Imported
- Click on Records to see your imported records.
What you expect to have at the end of the Importing step:
✅ Your imported records shown in the Records tab of your dataset page.
Encode my data
ℹ️ Encoding is not mandatory, though highly recommended, so that you can benefit from the enrichment offered by DAGI.
Despite not needed for publication or validation, supplementary mandatory attributes must be imported, because GBIF accepts new occurrences under certain conditions and some attributes are important for the correct attribution of a record to a Data Center.
The supplementary mandatory attributes are kingdom and country.
- If you want to encode only a certain set of your data, use the available filters.
- Quick-filters: Below the grey tab band, there are four boxes displaying from left to right: the total number of records (All records), the percentage and number of not-encoded records (Not encoded / Incomplete), the percentage and number of not-published records (Not published) and the percentage and number of not-validated records (Not validated). By selecting one, you can set a first level of filters.
- Search bar: Below the Quick-filters, there is a search bar (🔍Search) which allows you to look for specific values in the following attributes : cataloNumber, scientificName and occurrenceID.
- 🎚️Filters: Next to the search bar, there is this button which opens a pop-up window with available filters for your dataset. Currently, you can filter only the IUCN Red List categories, the MIDS levels, the Taxonomy of the ranks species, kingdom and phylum and the Location at the level of the continents. An improvement of the filters is planned soon.
- Click on 🧩Encode.
- A pop-up window Encoding Summary opens with a short summary of what the encoding does. Briefly said, it uses some fields as query values sent to available dictionaries of data (like GBIF API) to encode the provided values and enrich attributes with new values. It is extremely useful for taxonomic standardisation, georeferencing, species protection, etc. (see the section on the encoding in the FAQs for more details about what it does)
- If you change your mind, you can cancel and close the window at any time by clicking on Cancel.
- Click on Encode.
- A progression bar appears during the encoding process and disappears when launched. ⚠️ Depending on the number of your records, this step can take up to a day to be completed ⚠️ Closing your navigator has not impact on the process, you can come back later to check the encoding state.
- During the encoding, no other action can be started.
- Check the percentage of encoded data on your Dataset page (see the second box called Not encoded / Incomplete) in the Quick-filters.
- By clicking on any record, and then on the Encodings tab of the side-pane, you can check the encoding state of all catalogs used for encoding and enriching your data (e.g. geo_reverse, swiss_species, gbif_taxonomy, etc.).
- If the status is “Incomplete”, the record is “Not encoded”. The reason is displayed when clicking on the yellow ⚠️Incomplete icon. It opens the side-pane in the Encodings tab.
What you expect to have at the end of the Encoding step:
✅ A percentage of Not encoded / Incomplete records lower than 100% in the second Quick-filter box displayed in the Records tab of your dataset page.
⚠️ If some of your records do not have the necessary information for the APIs queries, then the Encoding status will remain Incomplete. This does not prevent you from publishing or sending your records for validation.
Export my data
- Click on 📥Export.
- A pop-up window Export Records opens and is composed of two parts: Data headers and Data layer.
- Select your data headers allows you to determine the column names of your export file. You can choose between your original headers, as imported in the Import my data part, or the Darwin Core (DWC) Attributes, which includes all available attributes in DAGI.
- You can select only one at a time. If you want both types, export the records twice.
- You can select only one at a time. If you want both types, export the records twice.
- Select the data layer allows you to determine which data values you want to export. You can choose between your imported data (Raw), as imported in the Import my data part, or the encoded data (Encoded), as encoded in the Encode my data part.
- You can select only one at a time. If you want both types, export the records twice.
- You can select only one at a time. If you want both types, export the records twice.
- Click on Start export.
- The page view changes from “Records” to “Exports” where all of your exported files are listed.
- A progression bar appears during the export process and disappears when finished.
- Click on the blue icon (📥xyz.x Mbyte) of your export file in the Size column.
- The file is now saved as a .zip file on your computer (usually in the Dowloads folder or on your Desktop).
- The file is now saved as a .zip file on your computer (usually in the Dowloads folder or on your Desktop).
- Go to the zip file on your computer and extract the CSV file it contains.
- A unique file name for this CSV file has been generated by the Data Aggregator.
- Your data content is separated by commas.
- The file is encoded in UTF-8. To facilitate the opening of the file, we recommend you use the Get Data from a CSV file method directly in Excel. This way the UTF-8 format is set properly.
What you expect to have at the end of the Exporting step:
✅ A ZIP file containing a csv file with all your exported records.
Upload images
⚠️ Only images that can be linked to an existing record in your DAGI dataset can be uploaded.
⚠️ This feature is NOT for high definition images, but for enhancing the visibility of collections who don’t have a publicly available image deposit.
If your images are already available online, simply add the url links to your images in the attribute associatedMedia.
- Prepare a ZIP file containing your specimen images.
- file name = your chosen attribute for mapping (recommended: catalogNumber)
- for records with several images, use the same file name but with an additionnal “_1” or “_2” or “_3” etc.
- file format = JPG, JPEG, PNG, BMP, TIFF, SVG or WEBP
- maximal file size = 5 Mb (Mo)
- maximale ZIP file size = 200 Mb (Mo)
- Click on Image Upload in the grey tab band of your dataset, then on ➕ Upload Images in the middle of the page or on 📤Upload Images in the top-right corner of the page.
— A three-steps pop-up window Upload Images has opened. —
- (Step 1️⃣ of 3️⃣) Click on Choose a file to select your prepared ZIP file or drag and drop it if you have a folder window opened on your screen.
- Wait until the purple bar is full.
- Click on Next
- (Step 2️⃣ of 3️⃣) Select in the drop-down menu Mapping Identifier the corresponding attribute to your file names.
- Click on Update mapping
- (Step 3️⃣ of 3️⃣) The last step is a summary window on which you can check your file name and size, creation date, the number of invalid files, and the mapped identifier.
- Click on Run Mapping.
- ⚠️ The State of your Image Upload is currently on ⚙️Extracting. This means that the Mapping can’t be run yet, even by clicking on it. As soon as the extraction is finished, you will need to come back and click (again) on Run Mapping. You can close your DAGI page in the meantime, or start the upload of another ZIP file. - You can check the status of your Image Upload
- Incomplete : All or a part of your images remained unmapped. This could be due to the name of the files and the values of the attribute you selected for the mapping. By clicking on the yellow ⚠️Incomplete icon, a side-panel opens with the details of your Image Upload. In the Logfile section, you can click on the 📥 icon which downloads a csv with the list of all the pictures of your ZIP file and the mapping status and attribute.
- Finished : All of your images could be mapped with a record in your dataset. By clicking on the green ✅Finished icon, a side-panel opens with the details of your Image Upload. In the Logfile section, you can click on the 📥 icon which downloads a csv with the list of all the pictures of your ZIP file and the mapping status and attribute.
- Mapping failed : None of your images could be mapped. By clicking on the red ❌Mapping failed icon, a side-panel opens with the details of your Image Upload. However there is no logfile. The failure could be due to the name of the files and the values of the attribute you selected for the mapping. If the problem persists after multiple trials, do not hesitate to contact us.
Now, in the Records tab of your Dataset, the records with an image have a green camera icon, and you can see the image when opening the side-panel of a record (only the first image is displayed if multiple images have been mapped to the same record). The link to the DAGI Media Store has been added in the attribute associatedMedia. When publishing your data, the image will also be displayed on the GBIF occurrence page of your specimen.
What you expect to have at the end of the Image Upload step:
✅ A green camera icon on the left side of your records in the Records tab of your dataset
✅ An image displayed in the top half of the side-panel of a selected record
Publish my data
- Choose if you want to publish your data from the Import layer (select 📤Import Layer in the filters) or from the Encoded layer (select 📤Encoded Layer in the filters)
- Click on 🌐Publish.
— A three-steps pop-up window Publication of Records has opened. —
- (Step 1️⃣ of 3️⃣) Publication of Records
- The text informs you of the number of records you are about to publish and if you need to create a new dataset.
- For the first publication of your DAGI dataset, the option to Create new dataset is automatically set.
- For the following publications of your DAGI dataset, the hyperlink to the existing dataset is provided.
- Click on Next.
- (Step 2️⃣ of 3️⃣) Target Dataset
- The text informs you on the metadata information of your GBIF dataset.
- The first part Dataset is about the title of your dataset, the Publisher and the Authors.
- The second part Institution is about your institution name, code and address, as well as the official contacts registered on GRSciColl.
- The third part Intellectual property rights is about the license you want to apply to your data : CC0, CC BY or CC BY-NC.
CC0 : No copyright, the work is placed in the public domain.
CC BY : users may distribute, adapt, translate, build upon the work as long as they credit the authors for the original creation.
CC BY-NC : users may reuse and adapt the work as long as it is not for commercial purposes. Credit to the authors is mandatory.
- Click on Next.
- (Step 3️⃣ of 3️⃣) Publication summary
- The last step is a summary window on which you can check the settings of Step 1️⃣, as well as the application of the publication rules.
- The publication rules are applied to specimens collected in Switzerland and of taxa treated by the data centers. The coordinates associated to such records are rounded as to not publish the exact location. If the data is ambiguous, DAGI prevents the publication and requests the user to check the unpublished records.
- The publication on GBIF is irreversible from DAGI.
- Tick the box to confirm that you accept the terms of use and full responsibility for the publication.
- Note that your institution, as data owner and provider, is fully entitled for the quality of the data published through the Data Aggregator and to GBIF. Errors in your published datasets are your responsibility and yours only.
- Note that your institution, as data owner and provider, is fully entitled for the quality of the data published through the Data Aggregator and to GBIF. Errors in your published datasets are your responsibility and yours only.
- Click on Publish.
- A progression bar appears during the publishing process and disappears when launched.
- The Publication status of your records have changed to 🌐In Publication.
- You can access the DarwinCore-Archive generated for the publication in the Publications and Validations tab and download it by clicking on the blue icon of the size (📥xyz.x kbyte)
- By clicking on Show on GBIF (purple text in the top-left corner of your dataset page and visible in all tabs), you can access your GBIF dataset. It might take some time for all the occurrences to appear, sometimes a few minutes or up to a day.
- ⚠️Do not delete a DAGI dataset after publishing on GBIF or it might create unwanted duplicates.⚠️
What you expect to have at the end of the Encoding step:
✅ A purple hyperlink "Show on GBIF ↗️" below the dataset title of the Dataset view linking to the published dataset on GBIF with your published records
✅ A gbifID, datasetID and gbifDOI added now to all of your published records in the Import layer, category Others of the side panel
Validate my data
How to navigate in DAGI
When logging in the Data Aggregator, the platform opens on the Datasets view.
In the top-right corner of the page, you can see your login name, the button to log out and the button to choose between light/dark/computer themes. The platform is available only in English.
Datasets view
The datasets displayed here are the ones that have been added by a Collection Administrator of your institution. You can only see the datasets of the institution you have been registered to upon creation of your user’s profile. The datasets are organised by default by order of creation. If you wish to order them differently, you can click on any of the available headers and order them in an ascending or descending order:
- Name: name of your dataset as stated on GRSciColl (collection name)
- Code: code of your dataset as stated on GRSciColl (collectionCode)
- State: is green (🕒Ready) when the previous action launched is finished and a new one can be started (Actions : 📤import a dataset, 📥export, 🧩encode, 🌐publish and ✅validate).
- Institution Code: code of your institution as stated on GRSciColl (institutionCode)
- Institution: name of your institution as stated on GRSciColl (institution name)
- Progress: progress bar linked to the number of records already imported and the total number of specimens stated on your collection page on GRSciColl
- Records count / est.: numerical display of the progress, with first the number of records currently present in the dataset on DAGI and second the total number of specimens stated on your collection page on GRSciColl
- Updated At: timestamp of the last action executed on the dataset
Only the Collection Administrators can add (🪟New dataset), edit (📝) and delete (🗑️) datasets in the Datasets view.
Dataset page
The page of a dataset has 5 available tabs.
-
The Records tab :
View on all imported records of the dataset with a selection of important attributes (Picture availability, IUCN tag, Typus, scientificName, verbatimIdentification, occurrenceID, catalogNumber, recordedBy, identifiedBy, eventDate, stateProvince & countryCode, verbatimElevation, decimalLatitude & decimalLongitude), the current state of the available actions (Encoding, Publication status, Validation status), the registration status in an Info Species data center (Swiss Registry), the MIDS quality level and the timestamp of the last update of the record.
The tab is separated in two parts: The filters on top (Quick filters, Search bar, selected Layer, Value filters) and the table of records below. The number of records displayed on one page of the table can be selected at the bottom of the page. -
The Imports tab :
View on all imported files of the dataset with a selection of important metadata (State of the import, File name, Size, timestamp of the import, and number of records imported from the file).
The State is either blue (⚙️In progress), green (✅Imported) or red (❌Failed).
🔸When the state is Imported, by clicking on the green ✅Imported icon, a side-pane opens on the right of the window and provides information about the file itself, the mapping saved and the unmapped columns.
🔸When the state is Failed, by clicking on the red ❌Failed icon, a side-pane opens on the right of the window and provides analyses information on the cause of failure. The red text informs on the number of rows with invalid data and the number of elements with a detected error. By clicking on the blue eye icon (👁️🗨️ = Preview error log) in the Error log section, a pop-up window opens with the catalog number and scientific name of the records concerned by the invalid data, the field containing the invalid data, the value that is invalid and an error message describing why it is invalid. The required changes have to be done in the import file. A new import attempt must be done to proceed further.
All imported files, even the failed ones, are kept at all times in the DAGI server. They are available for download by clicking on the blue icon of the size (📥xyz.x Mbyte). Deleting a file in the Imports tab does not delete it from the server, but only from the tab view. -
The Exports tab :
View on all exported files of the dataset with a selection of important metadata (State of the export, File name, Size, timestamp of the export, and number of records exported in the file).
The State is either blue (⚙️In progress), green (✅Exported) or red (❌Failed).
🔸When the state is Exported, by clicking on the green ✅Exported icon, a side-pane opens on the right of the window and provides information about the file.
🔸When the state is Failed, by clicking on the red ❌Failed icon, a side-pane opens on the right of the window and provides analyses information on the cause of failure.
All exported files are kept at all times in the DAGI server. They are available for download by clicking on the blue icon of the size (📥xyz.x Mbyte). Deleting a file in the Exports tab does not delete it from the server, but only from the tab view. -
The Publications and Validations tab :
View on all published or sent for validation files of the dataset with a selection of important metadata (State of the publication/validation, Channel concerned, File name, Size, timestamp of the publication, and number of records exported in the file).
The State is either blue (⚙️In Publication), green (✅Done) or red (❌Failed).
🔸When the state is Done, by clicking on the green ✅Done icon, a side-pane opens on the right of the window and provides information about the file.
🔸When the state is Failed, by clicking on the red ❌Failed icon, a side-pane opens on the right of the window and provides analyses information on the cause of failure.
All published/sent for validation files are kept at all times in the DAGI server. They are available for download by clicking on the blue icon of the size (📥xyz.x Mbyte). Deleting a file in the Exports tab does not delete it from the server, but only from the tab view. -
The Image Upload tab:
View on all uploaded ZIP files with images. The metadata provided in this tab is more comprehensive compared to the others, as it includes not only the State of the upload, File name, Size, and Timestamps of creation and start, but also the number of mapped, unmapped, and invalid images associated with each file. The Mapping identifier is also displayed and can be changed by clicking on the Edit action (last element in the far right side of the table).
The State is either blue (⚙️In progress), green (✅Finished) or yellow (ℹ️Incomplete).
🔸When the state is Incomplete, by clicking on the yellow ℹ️Incomplete icon, a side-pane opens on the right of the window and provides results information on how many images where mapped, unmapped or invalid. By clicking on the blue icon of the size (📥xyz.x Mbyte) of the Logfile section (bottom of the side-pane), a csv file is downloaded with the list of all images in the ZIP file and their matched attribute values.
All uploaded files are kept at all times in the DAGI server. They are available for download by clicking on the blue icon of the size (📥xyz.x Mbyte).
Administration view
The Administration view displays all users already added to your institution. You can only see the users of your institution. The users are organised by default by order of creation. If you wish to order them differently, you can click on the Email, First name, Last name and Phone headers and order them in an ascending or descending order.
The Roles column informs you on the role/s attributed to each user:
- Data Digitizer (execution role)
- can view and access the datasets of their institution
- can jmport, map, encode, export and send for validation the records in the datasets of their institution
- Collection Administrator (management role)
- can view, add, edit and remove users of their institution
- can view, add and edit datasets of their institution
- can publish datasets on GBIF.org
| Tasks | Collection Administrator | Data Digitizer |
|---|---|---|
| Users -view/add/edit/remove | ✅ | ❌ |
| Datasets -view | ✅ | ✅ |
| Datasets -add/edit | ✅ | ❌ |
| Records -import/encode/export/send for validation | ❌ | ✅ |
| Records -publish | ✅ | ❌ |
For each user, it is possible to edit their profile (📝) and delete them (🗑️).
Add a new user
- Click on 👤➕ Add User
- Enter the corresponding information in the First name, Last name, E-Mail (⚠️Mandatory⚠️) and Phone (💡optional💡) fields. The institution is automatically set and can’t be changed
- Enter a customed password or click on Generate Password.
⚠️Currently there are no user management, so do not forget to copy the password (by clicking on the 👁️🗨️ icon) and send it manually to the person concerned. The password of a user is available for display only during the creation steps. It is hidden afterwards. - Click on Next
- Click on the toggle switch/es corresponding to the role you want to attribute to the new user (see here above for the definitions).
- Click on Next
- Check the Summary step and if satisfied, click on Create user. The new user is added on top of the list and is moved at the bottom of the list when refreshing the page.
External links
Guide
By clicking on 📖Guide, a new tab is opened on the step-by-step page on how to publish data with DAGI (this page) of the SwissNatColl hosted portal. In order to facilitate the experience of our users, we check regularly the accuracy of the information given here, and update it with the new functionalities added by the development team. Do not hesitate to contact us if you see anything that is missing or unclear. The purpose of this support material is to serve the users’ needs.
Tutorials
By clicking on 📹Tutorials, a new tab is opened on the tutorial sessions page of the SwissNatColl hosted portal. This is where we inform you of the next live tutorial ZOOM sessions, in which you can ask your questions directly to Anne Morel, your contact person, who is acting as a bridge between you and the development team of DAGI.
On this page are also listed all the text material, use-case material and Powerpoint presentations, prepared to help you in your use of DAGI and also related subjects, such as data preparation and Darwin Core.
Terms & Conditions
By clicking on 📄Terms&Conditions, a new tab is opened on the terms of use page of the SwissNatColl hosted portal. This page sets the agreements and disclaimers relating to access and use of the Data Aggregator DAGI to mobilise biodiversity Data available in Switzerland. By accessing the Data Aggregator DAGI, each user was requested to accept to comply to the terms. This acceptation is renewed everytime a Collection Administrator publishes a dataset on GBIF.org.